Quick Links on this page:
How to ADD an initial email account to your Samsung Galaxy S4
How to EDIT your Samsung Galaxy S4 email account settings
How to ADD another email account to your Samsung Galaxy S4
How to REMOVE an email account from your Samsung Galaxy S4
How to ENABLE the Master Sync in your Samsung Galaxy S4
POP3 is the current version of the POP (Post Office Protocol) email protocol. It creates local copies of emails and deletes the originals from the server so the emails are tied to that specific machine and cannot be accessed via any webmail or any separate client on other computers.
IMAP (Internet Message Access Protocol) allows users to log into many different email clients or webmail interfaces and view the same emails, because the emails are kept on remote email servers until the user deletes them.
How to ADD an initial email account to your Samsung Galaxy S4
1. From the Home screen, touch:
Menu ![]() > Settings
> Settings ![]() > Accounts
> Accounts ![]() > Add account
> Add account![]() > Email
> Email ![]()
2. Enter your Email address and Password. If this is not the first email account you are setting up on your device, you can mark Send email from this account by default to set this as the default email account, and then touch Manual setup.

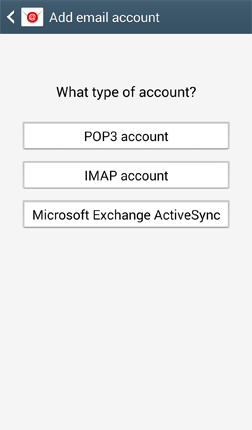
3. Select the type of email account you are setting up. You may choose POP3 account, IMAP account, or Microsoft® Exchange ActiveSync®. In this set of instructions we will walk you through setting up a POP3 account.
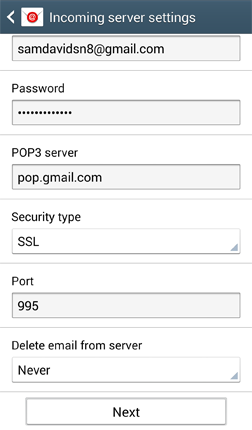
4. Enter your incoming server settings. This should include your Username (always your full email address in lowercase), Password, POP3 server (the server itself is usually mail.yourdomain.com unless the CharlesWorks staff have instructed you to use otherwise), Security type (using “none” will work), Port number (the phone should have populated this based upon security settings or whether you are setting up POP or IMAP), and Delete email from server (“never” is a safe bet) setting. Then touch Next.
NOTE: If you are a CharlesWorks client, and you’re not sure of the correct values for your domain’s email specific settings, contact CharlesWorks for your correct information.
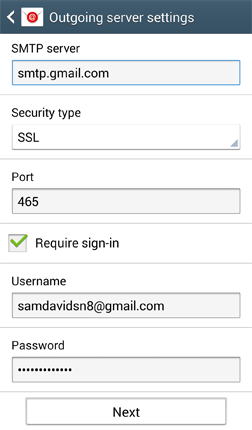
5. Your device will now attempt to connect to the incoming server with the settings you have entered. If unsuccessful, you will be prompted to Edit details; confirm your settings and try again. If the connection is successful, you will be taken to the Outgoing server settings screen. Enter your outgoing server settings. This should include your SMTP server (just like with the incoming, the server itself is usually mail.yourdomain.com unless the CharlesWorks staff have instructed you to use otherwise), Security type (for best results overall can use “none”), Port number (should be port 587), Require sign-in (always required), Username (always your entire email address in lowercase), and Password. Then touch Next.
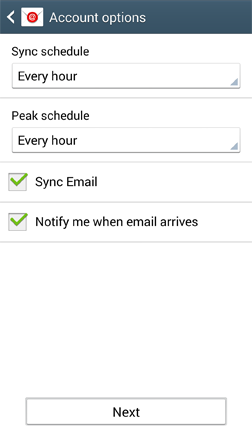
6. Your device will attempt to connect to the outgoing server with the settings you have entered. If unsuccessful, you will be prompted to Edit details; confirm your settings and try again. If the connection is successful, you will be taken to the Account options screen. Touch Next when you have finished making your selections.
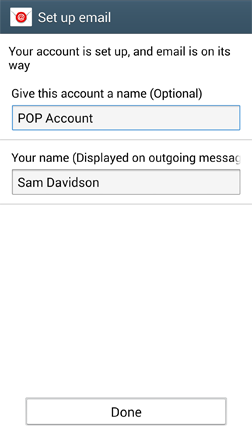
7. You will be asked to give this internet mail account a unique on-screen name. The unique account name is used to differentiate this account from other email accounts on your mobile device. Enter Your name as you would like it to be displayed on outgoing messages. Touch Done to complete the setup process.
NOTE: Unless the CharlesWorks staff have instructed you to do otherwise when setting up an email on a Galaxy S7 make sure Secure Authentication is not active.
How to EDIT your Samsung Galaxy S4 email account settings
From the Home screen, touch
Apps ![]() > Email
> Email ![]() > Menu
> Menu ![]() > Settings.
> Settings.
Touch Account settings > “Account name” for the following options:
- Sync settings:
- Sync Email: Mark this option to keep your email in sync.
- Sync schedule:
- Set sync schedule: Select how often your device should check for new messages.
- While roaming: Select how your device should behave when you are roaming outside your wireless service provider’s network.
- Peak schedule: Mark the checkbox to set how your device should behave during the defined peak schedule.
- Set peak schedule: Select how often your device should check for new messages during peak schedule.
- Peak days: Select the days of the week that are part of the peak schedule.
- Peak start time: Set the peak start time.
- Peak end time: Set the peak end time.
- Size to retrieve emails:
- Size to retrieve emails: Set an email size limit. Your device will download only the headers for emails that exceed this limit. When you open the message, you will be able to download the entire message.
- While roaming: Select the email size your device should download when you are roaming outside your wireless service provider’s network.
- Signature: Touch the slider
 Off to turn Signature on
  On . When turned on, your device will add the signature to all outgoing messages for this account. Touch Signature to edit the signature that will be sent.
 - Default account: Set this account as the default account used for outgoing emails.
- Password: Update your password.
- Email notifications: Checking this box will cause an email notification icon to appear within the Notification Panel and the status bar when a new message for this account is received.
- Select ringtone: Assign a custom ringtone to be played when this account receives new messages.
- Vibrate: Choose to set your device to vibrate when a new message comes in.
- More settings: Touch to access the following additional settings:
- Account name: Edit the account display name.
- Always Cc/Bcc myself: Include your email address in either the Cc or Bcc recipient field.
- Show images: Set the option to show all images when you are viewing emails.
- Security options: Set the encryption options for sending emails.
- Number of emails to load: Select the number of recent messages your device should download.
- Auto resend times: Select the number of times your device should try to resend a message after the first attempt fails.
- Incoming settings: Adjust the incoming email server details.
- Outgoing settings: Adjust the outgoing email server details.
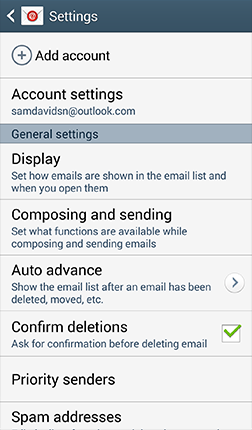
General Settings
The following General settings are available. These options affect all accounts you have added to your device:
- Display:
- Auto fit content: Adjust messages to fit the screen. You can zoom in and out of the message after it opens.
- Message preview line: Select the number of lines the Email application should show when previewing a message.
- Title line in list: Select the title the Email application will show in the message list. Choose Subject or Sender.
- Composing and sending:
- Quick responses: Edit the quick responses you can use when creating or responding to emails.
- Default image size: Set the default size of images received in messages. Choose Original, Large (70%), Medium (30%), Small (10%), or Always ask.
- Delay email sending: Set your device to delay email sending. This lets you cancel a send request if you accidentally touch send or want to change an email after you have touched send. Touch Delay email sending and mark the Delay email sending checkbox. Then touch Set length of delay and choose a delay message setting of 3 seconds up to 30 seconds.
- Auto advance: You can choose how the Email application should behave after you delete a message. You can have the application go to the Next email, Previous email, or Email list.
- Confirm deletions: Your device will confirm your desire to delete a message when you mark this option.
- Priority senders:
- Priority senders: Manage contacts added to the priority sender list.
Set as the default folder: Show the priority sender inbox when you open the Email application. - Email notifications: Checking this box will cause an email notification icon to appear within the Notification Panel and the status bar when a new priority sender message is received.
- Select ringtone: Assign a custom ringtone to be played when this account receives new priority sender messages.
- Vibrate: Choose to set your device to vibrate when a new priority sender message comes in.
- Priority senders: Manage contacts added to the priority sender list.
- Spam addresses: Edit the list of senders and domains that you have tagged as sending spam messages.
- Rules for filtering: Set filters and manage filtered email when using the combined inbox view.
How to ADD another email account to your Samsung Galaxy S4
From the Home screen, touch
Apps ![]() > Email
> Email ![]() > Menu
> Menu  > Settings > Add account.
How to REMOVE an email account from your Samsung Galaxy S4
1. From the Home screen, touch
Menu ![]() > Settings
> Settings ![]() > Accounts
> Accounts ![]() > Email
> Email ![]() and touch your account name.
and touch your account name.
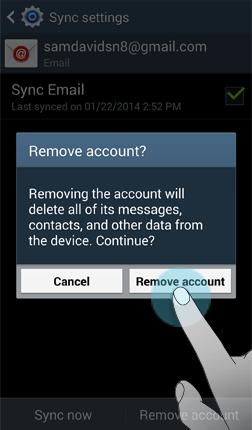
2. Touch Remove account.
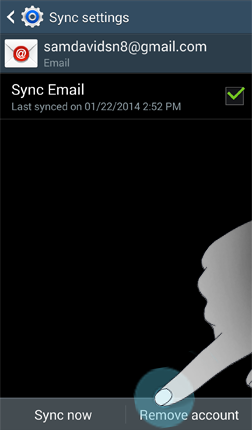
3. Confirm you would like to delete this account by touching Remove account.
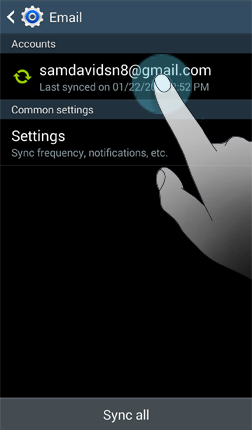
How to ENABLE the Master Sync in your Samsung Galaxy S4
1. You might run into a situation where you set up your initial email account and have all the correct settings to discover you can send email but the phone does not appear to be receiving email. You might also notice that your email synchronization settings are active, but you get the message “Master Sync has been disabled”. It is likely that your Master Sync is disabled and you need to enable the Master Sync.
From any screen, drag down the top portion of the Screen:
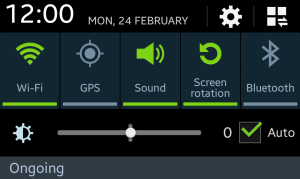
and touch the top right icon with 3 squares and a double arrow.
2. Then you’ll see the below screen as illustrated:.
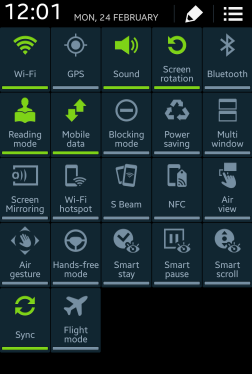
3. Touch the icon titled “Sync” to enable it and you should be all set.